Wednesday, February 8, 2012

It's always good to freshen up!

Well I fell in love with Zigzags. I thought about doing this or this.  But then I saw this and new what had to be done. While on vacation we stayed at a hotel that had bean bags as chairs in our room. With all these ideas together and finding the perfect material to match our feeling we have in our home. I went ahead and got a total of 13 yards of this fabric and with the help of my mother in law got my sewing machine to like me. Then the process started! 


I first made this bean bag chair... I used a zigzag stitch for a little more fun. We ordered the bean bag filler from sams only $9. 


Then I started on the curtains. Once I got one panel done I could barley stop I just wanted to see them all hanging. 


I think they turned out GREAT... I know it's a lot of zigzag but they are happy. 


So While I was sewing the husband got to work too! He helped move my office from our storage room to out in our main room. Here is the finished new area : ) I would like to add a magazine rack (from ikea) to the right of the photo for organizing paper for work.


And I got to show it off cause I love it so much! Our new lamp... : )


And of course with the little bit of leftovers I had to do something with them. So above you see the box and frame and lastly some pillows. It was a LOT of sewing, but our room seems a lot bigger and more open with the curtains up, it also helps to bring the somewhat odd shape room together with a purpose for each place. I sure do enjoy working out there better! We also did save a lot of moolah on the project by sewing it and of course have a one of a kind look. It's always good to freshen up!


Sunday, February 5, 2012

Finishing Touches

I have to admit our little closet isn't the worst room in the house anymore. In my very first post my hubby and I made a jewelry holder for the closet. This weekend I added the finishing touches to the little room. Here are some photos.


The pillow has grey stripes on the back just for fun... I also pinned some flowers on the pillow. These are flowers that I wear in my hair or on a cardi. I think it's a great place to hold them : )


Here we go the finished product all together isn't it happy!


And ofcourse, with some leftover paint I attacked the cheep brown wal-mart mirror... Love it now!


 It's been great to have a place that is happy to walk into in the mornings.

Thursday, February 2, 2012

BBQ Pork Crock pot Style

Well this is one out of my Experimental Edibles Board. And again easy easy easy!  I usually work mornings but this Wednesday I was scheduled mid day and would be getting home the same time as the hubby. So I thought this would be a great time to try a new recipe and excited to say we used the crock pot for the first time.

Here is what you need: Pork Tenderloin, Root Beer, Buns and your favorite Barbecue sauce. Yes that's It!


So it's almost too easy. Just put your 2lbs of pork tenderloin into the crockpot with 12oz of root beer and cook on high for 6 hours. When that is done it will be ready to shred but before shredding drain the root beer out. The meat was very easy to shred and super tender because of the root beer. After that is done (you can sneak a taste) and then add your 18oz bottle of bbq sauce and heat it up. Then it is completely ready! 


Here is a link to where I got this recipe off pinterest.


And here is our very yummy sandwhich. My husband and I both agreed we would have this one again! It's even better because this meal costs about $10 to $12 dollars and can feed four. Or if your like us, and just have the two of you, make pork nachos the day after with the leftovers... which is one of our favorites!


My happy husband and my somewhat scary facial expression... I really enjoyed this meal! Hope you try this too!  

The Little Sis, Shelly

Wednesday, February 1, 2012

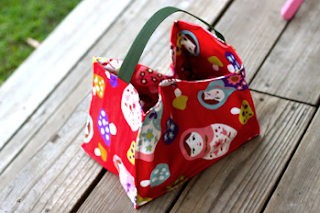
Waterproof Diaper Bag with Bottle Straps

I’ve been wanting a new diaper bag that is just right. My wishes were: 1) open top so I can find things quickly, 2) waterproof and easily cleaned, 3) hold the bottles and sippy cups upright so I have fewer messes.

Instead of oilcloth inside, I used a padded vinyl tablecloth. I used a great tutorial for this tote that I found on Pinterest.
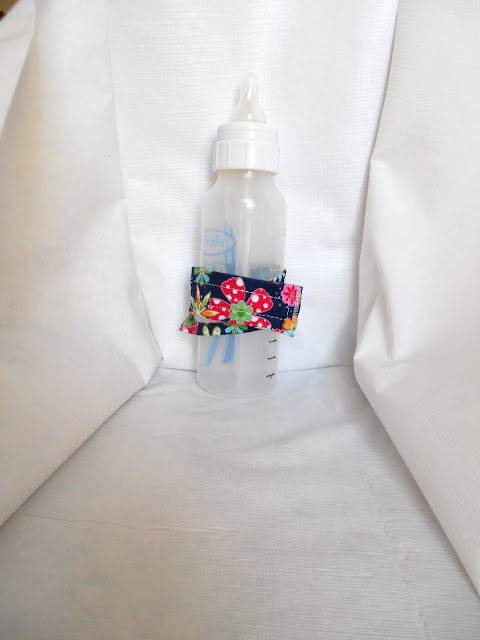
The bottle straps are my favorite part!

Here’s how I made them:
-Cut out the vinyl pieces for your bag.
-In your contrasting fabric, cut a 2 ½” wide x 11 ½” long piece. Fold with right sides in and sew into a long tube. Use a safety pin to turn it right side out.
-Use a zigzag stitch along the ends to sew closed. Put one piece of sew-on Velcro on one end, turn the strap over and put the other piece on the other end. This forms a ring.
-Measure how high you would like your bottle straps to be (leaving ½” seam allowance at the bottom). Use a zigzag stitch to sew the bottle strap onto the right side of your vinyl material.

-Finally, return to the tutorial and sew the inner pieces of the bag together.


Voila!


I am completely in love with this bag and made another, smaller one for short trips and for church.


Sticky Bun Yummyness

I am always looking for something creative and fun to make for our small group that we host at our home every week. I found this recipe on Pinterest and it was to easy I couldn't pass it up.

Here is the only ingredients you will need:


2 small tubes refrigerator buttermilk biscuits OR 1 tube Pillsbury Grands buttermilk biscuits
(i used the 1 tube of Grands and I think next time I will try the 2 tubes of smaller just so there will be more pieces for everyone)
3 Tbsp. butter or margarine, melted
1/2 C. pancake syrup
1/3 C. packed brown sugar
1/2 tsp. cinnamon
She also suggest using nuts... I think this would make it more fancy and fun... I just don't like nuts. 
1/4 C. chopped pecans, opt.
1/4 C. chopped almonds, opt.

Step One is to spray a fluted pan with non-stick spray. This marks the first time I have used the pan that my sister got me! Then combine the melted butter and syrup in a small bowl and set aside. In another bowl, combine the brown sugar, cinnamon, and nuts (if desired). 


This is where the fun starts, place half of the syrup mixture in the bottom of the pan. Then sprinkle half of the brown sugar mixture on top. Then lay the biscuits in the pan, overlapping  to form a ring.


Then Top with remaining syrup and sugar mixtures. Bake at 375 degrees for approximately 20 minutes or until golden brown. Cool for 1 minute in the pan, Then comes my favorite part, flipping it over onto the serving dish.  There was glaze galore so yummy! 


AND our friends from our small group approve they said they loved it. How can you get easier than this recipe with such yummy results?! One Friend recommend adding cream cheese to the biscuits before they go in the pan. (sounds good to me!) I hope you try it and love it as I did! 

Also check out the pictures from the Pin I repined, her photos are so much better and give it better justice! I will try to use my "big camera" next time to get some better shots : ) Thanks for reading!


The Little Sis, Shelly

Saturday, January 7, 2012

DIY Jazzy Jewelry Holder

Well I found some inspiration on Pinterest on a much better way to hold my Jewelry than I had been previously. So this weekend I decided it just had to change.  Here are the steps I took to make a much prettier and efficient place to pick out my jewelry for the day.

So what we started with... a bunch of necklaces, an empty closet wall, a board, paint, and some cute shower hooks.

I got my hubby to help me measure and drill holes in the top of the board the right size to fit the top of the shower curtain hangers would fit snug. 


I painted the board with a paint tester from The Home Depot. (on sale for 50 cents!) After the paint dried I attached the shower curtain hangers with glue inside the holes in the top of the board. 


Next I taped off the place in the closet in order to paint the space with another 50 cent paint color.


We hung a shelf (when I say we, I mean my hubby mostly did it i just watched) Put it at the bottom of the paint line.


Again the hubby secured my new necklace holder to the wall.

Tada!  Here is the finished product. A very easy way to pick and choose what to wear for the day and just makes me smile when i step in the closet!  Using the cheese grater to hold earrings was also an idea from pinterest check it out here.


The Little Sis, Shelly