Monday, February 20, 2012

Cute Umbrella Baby Shower Invite

I'm throwing a baby shower! One of my friends is having a baby girl in April and I'm in charge of the shower. I had to make an invite, and fast!


After searching on Pinterest, I chose this cute, handmade invite as my inspiration. 


Although, I'm not making my invites by hand...I think mine turned out pretty cute! I'm especially excited about the umbrella ampersand I drew! 


Wanna copy of it?! Get it here!

Boy Cords


The "Made" website is so cool! I love looking through the patterns and pinning all of them. But I figured I should actually try to make something instead of just pinning all the time :-)

I had some of my husband's old cords that had seen better days, so I used those.

I printed off the pattern from the website and put the front on one leg of the cords and the back on the other leg. The hem is already done for you!!!

Trace with a Sharpie :-) and cut out.

Sew the inseam together.

Sew the outsides together.

Fold down the top about an inch and sew, leaving room to insert the elastic. Then sew it closed. So cute!!!

The Big Sis!

Ladyfingers

I love tiramisu! I've wanted to make it ever since I first tried it 10 years ago. But I was afraid of tiramisu. 
Let's bust the common myths surrounding tiramisu:
1) Tiramisu takes forever to make! Not really, it just takes some patience. I separated this into 2 parts so I wouldn't have to do it all in 1 day.
2) Tiramisu is expensive to make! No way! This sucker was cheap! It's mostly eggs.
3) Tiramisu is hard to make! Yesterday I thought so too, right up to the minute I was making it. But it wasn't really that hard. I promise!
4) Tiramisu uses ingredients I can't get here! Sure, but if you use the right recipe, you can get everything you need at a local grocery store or Wal-mart. I promise.


I found this recipe on Pinterest and had to try it!


So let's start...
Today, the Ladyfingers.
These are a no-find in my dinky little town. So I had to make my own. I used a recipe from allrecipes.com.
Here are the ingredients:

First I separated my eggs.

And sifted the flour and baking powder together.

Then I beat the egg whites and added some sugar to them.

Next, beat the eggs yolks and lots more sugar.

Gently fold both the egg mixtures together and add the flour.

Stuff it into your pastry bag. Get a big one or just use a ziploc. They are going to be hidden by tons more eggs and whipped cream so as long as they resemble fingers you'll be great.

Pipe them onto sprayed cookie sheets or a silpat mat.

Bake for 8 minutes, remove immediately from the sheet, cool and try not to eat them so you'll have enough for the tiramisu!

After making these, I froze them in ziplocs so they would stay fresh until I worked up the nerve to make the tiramisu. They did great.

I am making another tiramisu tomorrow for a dinner party. Now that I'm not scared to death of making it, I'll take pictures! More to come!


The Big Sis!

Monday, February 13, 2012

A Heart Shaped Cookie for YOU

"Are you serious" is what I thought when I saw these on pinterest. I had to have them! Just want to add that I didn't buy these on a wim. I did think about it for a day before purchasing them... and couldn't help but buy them.  Think about how many party cookies we will make with these throughout the years! 


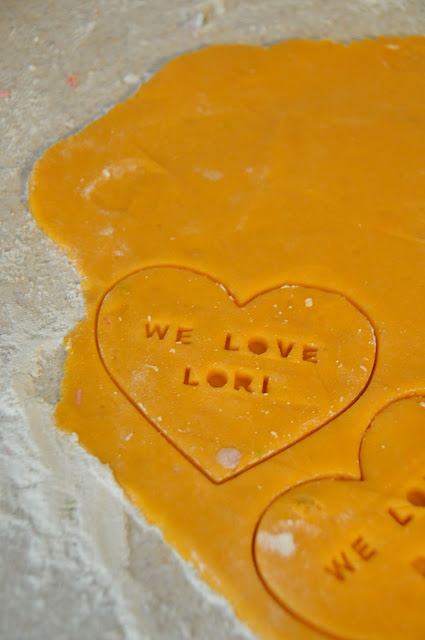
So these cookie cutters have groves in the back that you can slide provided letters in. This means you can write practically any word or name you want to!!!! Seriously!!! I am going to go crazy with these for parties! 

 Here is my first batch. They provide you with some common words and phrases so you don't have to do each letter by it self, like "I Love You" which I used here : )


Then I started to personalize. 


This Valentines day was a perfect first time to use these cookie cutters though because I was able to practice everybody's name : )


Again, I just want to say how excited I am to do these over and over for different occasions. I can't help but think about how cute it will be for baby showers and birthday parties! Oh too easy!!! I'm one happy girl! Thank you Pinterest!

The Little Sis

Friday, February 10, 2012

Chicken Parmigiana Wonderfulness

I am so excited that I made this meal. Seriously when your husband says it's the best meal i have ever made and your three year old niece says, "um this chicken is good." It makes it all worth it! 


 I got this from a really fun pinner, reading her blog post was not only entertaining but easy to follow and I loved her pictures.  
What you need:


  • 4 Boneless, Skinless Chicken Breasts,
  • 1/2 cup Flour
  • Salt And Pepper
  • 1/2 cup Olive Oil
  • 2 Tablespoons Butter
  • 1 whole Medium Onion, Chopped
  • 4 cloves Garlic, Minced
  • 3/4 cups Wine, (I used red)
  • 3 cans (14.5 Oz.) Crushed Tomatoes
  • 2 1/2 Tablespoons Sugar
  • 1/4 cube Chopped Fresh Parsley
  • 1 cup Freshly Grated Parmesan Cheese
  • 1 pound Thin Linguine (which my store didn't have so we used angle hair)


This meal did cost a little more than I usually spend but it doesn't help when your out of everything including butter. It was a little under $30 (including bread) but when having people over that's ok for a special meal.   Let's start cooking!

Place your raw chicken inside a ziploc and seal, leaving about an inch for air to flow. Beat it like a crazy person so that it becomes about 1/8 1/4 thick. That truthfully was a workout. 


Add Flower to plate and mix in salt and pepper. 


Then you salt and pepper the chicken on one side and place that side down in the flower, and continue with the other side and the rest of the chicken. 
This is my first time breading chicken which is one reason I am so excited about this dish! 


Heat up a Larger skillet than what I have over med heat and add oil and butter.


 After it all heats up you can carefully add the chicken to the pan. She says you want to cook it on the first side until the edges start to get golden brown.


Then flip it over and cook the other side for a couple of min. While this was cooking I was cutting up my onion and garlic. It took a little longer for me since I had to do one at a time in my pan. But it was well worth it! Look how gorgeous this is!


Add your chopped goodies to the pan with all that left over goodness. (over med low) Let them cook for a couple min.  Then add the wine. This is also my first time to cook with wine. 


 Let it cook for several min until it starts bubbling like photo bellow. It will turn a dark brown almost and reduce by about half.


Add your tomatoes (over med heat) and after it warms up a bit you will add some sugar. Add salt and pepper too. This is the fun part because you can sneak a taste! Then after it cooks for a couple min add in some parsley and fresh parmesan. Total you will want it to simmer for about 20 min. 


 At this point when you stir it it will start to get a little thicker and that is when you know that you have just created an amazing sauce. That your husband will love! Give your creation a final stir and then place your wonderful breaded chicken on top of your sauce. (I have included in picture the spots of sauce that have jumped out of the pan)


Then sprinkle on as much parmesan you can get to stay on top of each chicken and cover and simmer until the cheese is melty and you just can't stand but finish this so you can eat it. 


Ok let's dish it up with your pasta on the plate sprinkle cheese under where you will put the chicken and make sure to add some extra sauce to the pasta. And Eat!


This took me about a hour and 10 min. But it was fun and well worth it for a special dinner! 

Hope you try it!

The little sis

Wednesday, February 8, 2012

It's always good to freshen up!

Well I fell in love with Zigzags. I thought about doing this or this.  But then I saw this and new what had to be done. While on vacation we stayed at a hotel that had bean bags as chairs in our room. With all these ideas together and finding the perfect material to match our feeling we have in our home. I went ahead and got a total of 13 yards of this fabric and with the help of my mother in law got my sewing machine to like me. Then the process started! 


I first made this bean bag chair... I used a zigzag stitch for a little more fun. We ordered the bean bag filler from sams only $9. 


Then I started on the curtains. Once I got one panel done I could barley stop I just wanted to see them all hanging. 


I think they turned out GREAT... I know it's a lot of zigzag but they are happy. 


So While I was sewing the husband got to work too! He helped move my office from our storage room to out in our main room. Here is the finished new area : ) I would like to add a magazine rack (from ikea) to the right of the photo for organizing paper for work.


And I got to show it off cause I love it so much! Our new lamp... : )


And of course with the little bit of leftovers I had to do something with them. So above you see the box and frame and lastly some pillows. It was a LOT of sewing, but our room seems a lot bigger and more open with the curtains up, it also helps to bring the somewhat odd shape room together with a purpose for each place. I sure do enjoy working out there better! We also did save a lot of moolah on the project by sewing it and of course have a one of a kind look. It's always good to freshen up!